


THOSE PHOTOS LOOK SO GOOD, THATS A 30 DOLLARS VERY WELL SPENT WITH THE PHOTOS THAT YOU WILL BE ABLE TO TAKE NOW!!!

 Friend To All Starry Cats
THOSE PHOTOS LOOK SO GOOD, THATS A 30 DOLLARS VERY WELL SPENT WITH THE PHOTOS THAT YOU WILL BE ABLE TO TAKE NOW!!!
THE RAINBOW BRIDGE FOUND HOTEL ANGELS HAVE A NEW FRIEND IN CORINNA.
ALMOND ROCCA BATON AND ELLIE ANGELS ARE GUARDIANS TO ETERNAL KITTENS ROCC-EL AND T TEEN ANGEL, ALMOND ROCA , VLAD , PAWLEE , SPRITE. LITTLE HEX, OSIRIS AND ANNIE ANGELS.
EBONY BEAU TUBSTER AND PEACHES BW SPIKE & SMOKEY
NOW PRECIOUS AND SAM ARE TOGETHER WITH ETERNAL KITTENS SAMMY ,PRESLEY, SYLVESTER AND SCRATCHY JR , MIGHTY MARINA, COSMIC CARMEN, SAMSON ,UNDER KITTY AND SUNKIST AUTUMN & PUMPKIN.
MIA AND ORANGE BLOSSOM ANGELS HAVE ADOPTED TUXIE , TROOPER , SONGBIRD AND LITTLE BITTY KITTIES MIA-MI BLOSSOMER, TUXEDO AND DASH AS THIER ETERNAL KITTENS.
PRINCESS JOSEPH AND MICHAEL ARE CELEBRATING 19 YEARS AS LUCKY FOUND CATS
Vet Assistant 16 years
As promised: an explanation, in pictures, about how you know when you need a reflector and what things look like with and without one.
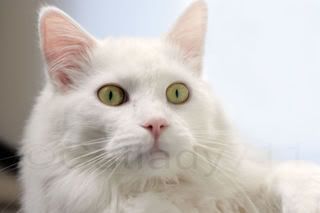
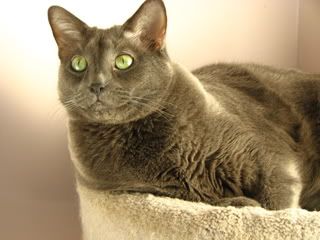
Since Pooky is my most laid back cat, AND happen to be sleeping in the spot I wanted to use, he became my volunteer for today's lesson. ROFL
To be fair to those of you with simple Point & Shoot cameras, I shot all these pix with my Canon S3IS point and shoot set on P (program) mode. I did NOT do ANY processing at all, these are all straight from the camera, only downsized for posting.
(please forgive me, these are about as 'snapshot' as they come for me! lol I had VERY little time to do these today)
Anyway today's lighting outside was HEAVY overcast so lighting was very dim despite how it might look in the pix. The window on the right is my North facing picture window (North windows usually have the best lighting anyways)
Ok, ready??? Here we go.....
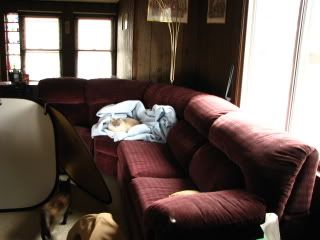
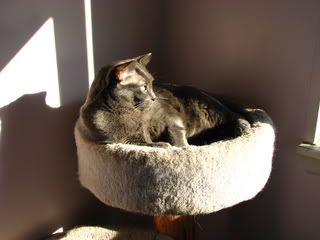
Here's a (lousy) pix of my livingroom and Pooky's favorite blanket so you can get an idea of what the lighting looked like overall.
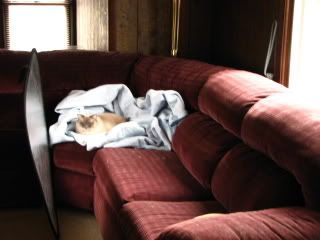
Here's a close up portrait of him in that same location, same lighting, WITHOUT using any reflectors.
Notice the dark shadows across his face? This tells me I need more light there so I can see his pretty eyes. I don't want to turn on the pop up flash (more on that in a bit) so I need to do something to get more light to the shadow area.
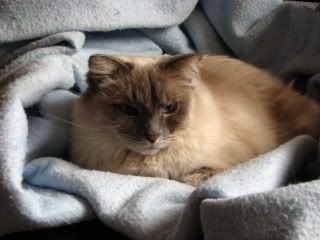
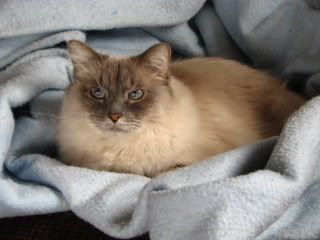
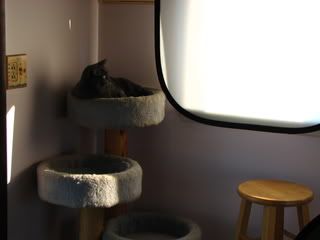
Here's a set up with the silver reflector in the same place as I had it in the shot in the opening post of this thread. You can see how it adds more light to the shadows even this far away.
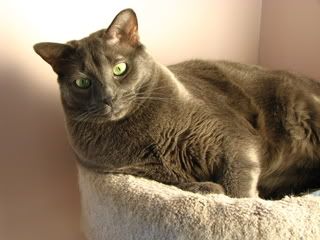
And here's the close up portrait with that same set up.
Hmmmm. Better but not quite what I want, and not the same as last weeks shot. Why? The lighting outside was brighter before, and it was a different time of day when I shot that very first one at the top of the thread. Light changes a bit all the time and I have to notice that and make changes sometimes.
So what do we do now???
We move the reflector that's what we do.
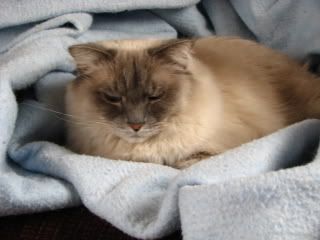
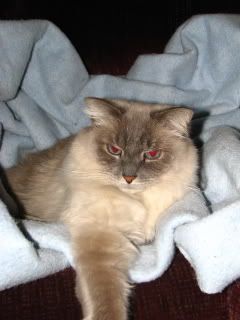
Here I moved it (proped it up with my other reflector actually with Sassy supervising) so it's reflecting light from underneath a bit more.
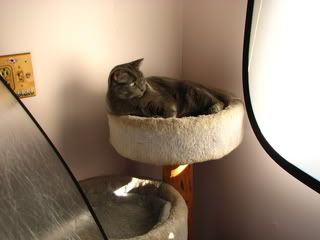
Here's what that set up will give me.
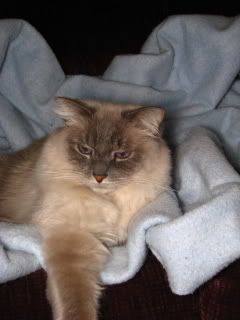
Much better. If I'd had more time I could have bent or moved the reflector around to get a pix that looks very close to the one at the top of this thread, but I simply did not have time. You get the idea though. No flash, natural look, no red eye, no super dark shadows hiding details in his face, and a nice catchlight (glint) in his eyes.
In this pix you can see the brightest area is actually under his chin which tells me I should have tilted the reflector just a bit more upwards. A reflector works on the same angles that you have if you were using a mirror to shine light onto a wall, or for a signal, only using silver with some texture (wrinkles) in it makes a nicer light.
On to the pop up flash in the next post.
Last edited by Catlady711; 01-06-2009 at 07:21 PM.
Vet Assistant 16 years
Ok pop up flash. Not the nicest looking light, but it's portable, you always have it with you, and sometimes it's either use the pop up flash or miss your shot. So how do we make it look Purrrrtier?
Simple, we grab a piece of white, thin computer paper! Stay with me now, I haven't lost my marbles.....yet. ROFL
Here I removed all the reflectors and just worked with the lighting from window. It was too dark so I let the pop up flash do it's thing.
I turned the camera vertical so you could really see the harsh, black shadow behind Pooky better, and the full red eye. *shivers*
Here's where the white, thin piece of computer paper comes in. Hold it in FRONT of your pop up flash. You want it at the very end of your lens but NOT in front of, or even with your lens or you'll get flare or a blob in your pix.
I took a pix in my bathroom mirror of what this looks like, yes it's a two hand job but it works, trust me. This makes the light from your flash larger and softer. (try a shot of your camera with and without the paper at home in your mirror and you'll see the difference) I did not change my white balance setting which is why the pix is so yellow orange.
Ok so what does that computer paper make Pooky look like now? See for yourself.
Yes it's a bit darker (that will vary depending on how your camera is set up, how bright your subject is, and the room lighting), but notice a few things in this shot.
The red eye is seriously reduced (yes I had the red eye reduction set on the flash for BOTH shots), the shadow behind Pooky is much softer which is less annoying, and the lighting shows more of the detail in Pooky's fur.
The computer paper (or white rice paper, or something similar) helps to give you a better light with very little expense or hassle. This will only work on subjects fairly close to you as it does cut the light from your flash some. I didn't have my flash cranked up to full power or these would have looked more dramatic in the differences.
Due to lack of time, and too dim of lighting I was unable to do the shots to show you how a white translucent reflector works. So that lesson will have to wait for another day.
Give me your thoughts on my "reflector lesson" and if you want me to do this for the white translucent one or not.
And for you Josh fan's out there, I did manage to get one pix of him processed just for you guys!!!
Vet Assistant 16 years
At this point don't worry too much about flash guns. LOL Just using a piece of cardboard with wrinkly alumminum foil (dull side out), or a piece of computer paper will get you about what I shot today.Originally Posted by jenn_librarian

Suffice to say a 'flash gun' or off camera flash or studio strobe will make better pix for lighting, but can get a bit more complicated and you would need to have a good grasp on photography basics first.
I can cover more on 'flash guns' later if people want, but I tend to gear my 'lessons' (yes I do this at home and online alot for people that ask) more towards people who love photography, but only have simple cameras, or aren't very advanced photographers.
Last edited by Catlady711; 01-06-2009 at 07:38 PM.
RIP Dusty July 2 2007RIP Sabrina June 16 2011
Registered User
it's amazing the difference that that silver reflector made. Pooky was very accommodating with the whole set up too, lol!
I definitely appreciate the lessons.
Vet Assistant 16 years
Yup, I can see it now, all of PT will be putting crinkled aluminum foil (NON shiney side out!) on cardboard now. LOL Also a car window shade (those silver things that they have in the auto dept. that's for the windshield in the summertime) work pretty good too. I have two of those also. LOL
Yeah, that's why Pooky gets so many more pictures done of him sometimes, he's more laid back.
No problem. I enjoy talking about photography about as much as I love talking about pets. lol And I always had wished that I'd had someone to teach me this stuff when I was starting out instead of just library books. Now-a-days I think they call this 'paying forward'. lol
RIP Dusty July 2 2007
Registered User
I learned a lot from your lesson and really liked the photo demonstrations!! Any thing that you are willing or able to teach us is very much appreciated. But please don't spend too much of your valuable time thinking about our Pet Talk Photography Lessons. Thank you so much!!
Vet Assistant 16 years
No problem, I enjoy doing it most of the time. It's just normally on Tuesday's I have alot more time available than I ended up with today because of other things.
I would have liked to do the silver reflector thing today but without stronger lighting it's not going to show what it does, and personally I learn quicker through pix. Hopefully Thursday our weather will clear and get a bit more sunlight.
I'm glad people seem to enjoy my shots and tips.
RIP Dusty July 2 2007
Registered User
I meant to also say that your subject is beautiful! Just sitting there while you changed your reflectors around and still ready for the closeups...must be a professional model in fur clothing.
I'm not a huge fan of flash myself. I have taken some pictures of Morgan in his new beds. He closes his eyes with the flash. I have turned the flash off and left it to the ISO to get a picture. But they turn out very yellow. I noticed you mentioned something about that in your post and referenced white balance. I've heard of that several times but haven't grasped the full concept. Perhaps you could have a brief tutorial of that subject sometime when you get the chance.
Registered User
BEAUTIFUL PHOTOS!!!!! Excellent job! Love them.... I wish I could get some photos of the fur kids that look that good!
*I've been Boo'd*
Vet Assistant 16 years
Pooky says 'thank you'.
Yup, photography seems easier when you have a beautiful model. hmmm wonder how he'd look draped across the hood of a sports car? ROFL
Sure I can do a tutorial, with pix of course, on color casts (aka. white balance). That one is fairly easy to show in pix what's happening. I'll see what works out for when I can do that one.
RIP Dusty July 2 2007
Registered User
You sure do take wonderful pictures.
I normally take most of my pictures inside because most of them are of my cats which are indoor only. I try not to use the flash but sometimes I have to. I do have a program on my computer that fixes redeye but it doesn't fix the weird alien eye that I sometimes get from non blue eyed cats. Thanks again and I look forward to more lessons in the future.
Owned by Abys
The flash gun can be on the camera or stand alone being triggered by a wireless connection. Most flash guns come with a snap-on foot.
Could have been better pictures if I could have used that camera!
Randy
Registered User
Gorgeous, absolutely GORGEOUS pictures of your cats. The one of Josh is breathtaking.
R.I.P. my Precious Katie, Katie Pretty Lady.
Oct. 1991 - Oct. 9, 2005
R.I.P. my Beloved Wild Hair Wee Willy Winky
April 8, 2005 - June 19, 2009
R.I.P. my best friend Buddy.
Sept. 1993 - Feb. 04, 2010
R.I.P. my handsome Mooky.
July 24, 2002 - April 1, 2010
Vet Assistant 16 years
Ok we had some good strong sunlight today so I was able to do my "pix tutorial" about how the white thingy works (technically called a translucent reflector/illuminator, but we'll call it a white thingy because it's easier to type and more fun to say LOL).
Again, to be fair to those of you with simpler point and shoot cameras, these were all shot with the Canon S3IS on Program Mode, and NO processing, only downsizing for posting.
This white thingy is really cool because it can do two things depending how you use it.
A cheaper substitute would be a piece of white poster/foam board for the reflector part. You can use a thin but all white shower curtain or a fair quality white bed sheet for the other part.
(yeah I buy expensive stuff sometimes but I know how to use the substitutes as well, I still keep 4 sheets of big poster boards and a white sheet around the house and use them still)
Ready for the 'white thingy' tutorial? OK!
Modeling for us today is Bear, who has kindly volunteered his services for this tutorial.
Ok so here's your situation, you've got this great sunbeam coming in the window with your pet laying there snoozing (ok so Bear elected not to snooze), you go grab the camera and this is what you get.
OUCH, harsh shadows on the wall, shadows go a total unrecognizable black near his butt, and some parts of your picture have horrible white washed out areas. Hmmm, think we can do better? You bet.
Here's where the white thingy comes in. Light goes through it but it's softer light and spread more evenly.
So we prop up the white thingy in the window and hold it up with a clothespin to the curtain rod. It looks like this.
So now here's what we get for a pix with that set up.
Better. The shadows still have details in the fur, and the nasty shadow behind Bear is gone. There is a bit of way too bright area behind Bear on the wall though. This could be eliminated if he weren't so close to the wall, but that's where my model's kitty castle is, so we just live with it. LOL
There's still a fair shadow on the side of his face and neck though and we can get that tamed down even more. How? We add the silver reflector from the other 'tutorial'.
Since Bear is being such a good model we're going to give it a try.
Here's the set up for that combination. I held the silver one just a bit different angle than this pix shows to get the next shot.
And here's what our picture looks like now.
Much better, we can now see Bear's lovely fur texture on the other side of his face as well.
"ok so what's the deal with the reflector part of the white thingy and how is it different than the silver thingy?"
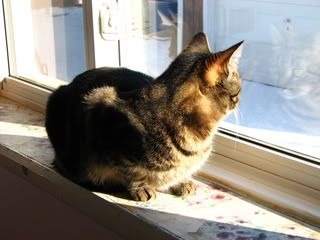
No Problem! Modeling for this tutorial part is Cami, who kindly volunteered her services for you.
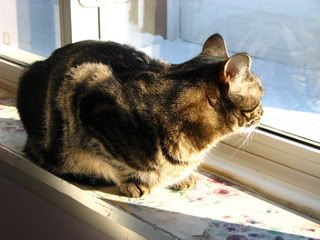
Here's the problem, kitty sitting in the windowsill watching birds, bright sunlight shining in. Like this....
Oooh, we can't see those lovely stripes in her fur at all!! This just won't do. We need something.
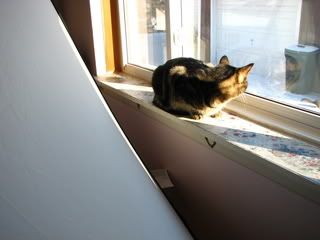
Hmmm lets see, how about a white thingy? Let's try it ok?
So this is what our pix looks like now.
Now we can see some of the stripes on her side facing the camera. The white thingy puts a little light in when you don't want a whole bunch. Depending on your subject's fur/skin and the lighting you may just want a soft fill like that.
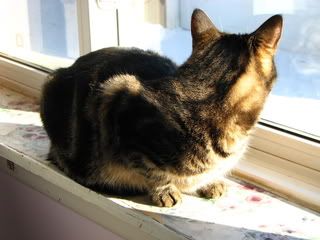
In my case today, I really want to see those stripes!
So lets try swapping the white thingy for the silver one and see what happens.
Better! Now I can see her Purrty stripes!!!
So what do you do when you only have a second to get the shots, and/or a skittish critter?
We can make use of the pop up flash.
More on that in the next post.
 Posting Permissions
Copyright © 2001-2013 Pet of the Day.com


 Reply With Quote
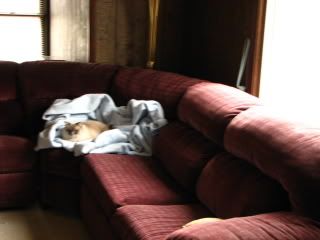


Bookmarks