


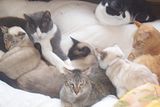
I finally learned how to make the cat beds that many on here have been making! My kitties love them!
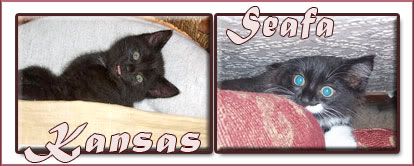
Katie, Dexter Roxie
Roxie:
Katie:
Dexter:
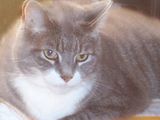
Pava:
Bonnie:


 In All Things Give Thanks
I finally learned how to make the cat beds that many on here have been making! My kitties love them!
Katie, Dexter Roxie
Roxie:
Katie:
Dexter:
Pava:
Bonnie:
Last edited by kimlovescats; 02-27-2006 at 01:20 PM.
Kim Loves Cats and Doggies Too!
Registered User
Great pictures. I'm glad that they like them.My cats love theirs too.
Seven is Heaven!!
Hi Kim!! You really did a great job on the beds!! Beds EXACTLY like yours were selling at the cat show I went to today for $18/bed!!! I'd order a bed from you anyday!!!
Nine is Fine!!
Registered User
What a fabulous job you did on those cat beds Kim.
Great pictures.
R.I.P. my Precious Katie, Katie Pretty Lady.
Oct. 1991 - Oct. 9, 2005
R.I.P. my Beloved Wild Hair Wee Willy Winky
April 8, 2005 - June 19, 2009
R.I.P. my best friend Buddy.
Sept. 1993 - Feb. 04, 2010
R.I.P. my handsome Mooky.
July 24, 2002 - April 1, 2010
Registered User
what a greatjob. they love those beds.
Finally I got catsters for my beauties!!
http://www.catster.com/?260059
http://www.catster.com/?260064
I love my precious kittens and I hope they have long and happy lives filled with love.
Cats and dogs arent pets, theyre family members that need the same respect as humans. Would you dump your children out in the countryside to fend for themselves??
Friend To All Starry Cats
Who Would Not Love Those Beds.
I Jsut Wish That I Was There,so I Could Curl Up On The Couch Beside Them.
What A Great Meowmie You Are To Make All Those Beds For Them.
THE RAINBOW BRIDGE FOUND HOTEL ANGELS HAVE A NEW FRIEND IN CORINNA.
ALMOND ROCCA BATON AND ELLIE ANGELS ARE GUARDIANS TO ETERNAL KITTENS ROCC-EL AND T TEEN ANGEL, ALMOND ROCA , VLAD , PAWLEE , SPRITE. LITTLE HEX, OSIRIS AND ANNIE ANGELS.
EBONY BEAU TUBSTER AND PEACHES BW SPIKE & SMOKEY
NOW PRECIOUS AND SAM ARE TOGETHER WITH ETERNAL KITTENS SAMMY ,PRESLEY, SYLVESTER AND SCRATCHY JR , MIGHTY MARINA, COSMIC CARMEN, SAMSON ,UNDER KITTY AND SUNKIST AUTUMN & PUMPKIN.
MIA AND ORANGE BLOSSOM ANGELS HAVE ADOPTED TUXIE , TROOPER , SONGBIRD AND LITTLE BITTY KITTIES MIA-MI BLOSSOMER, TUXEDO AND DASH AS THIER ETERNAL KITTENS.
PRINCESS JOSEPH AND MICHAEL ARE CELEBRATING 19 YEARS AS LUCKY FOUND CATS
Registered User
Those beds are really cute, looks like you did a great job! Your kittys are cute as well.
Forever in my heart...
Casey.Ginger.Corey.Mandy.Sassy
Lacey.Angel.Missy.Jake.Layla
Adopt A Special Needs Pet
MY YOU'VE BEEN BUSY! Great job Kim...sure wish I had the time to make some "kitty condoms" *sigh*! I used to sew all the time, and then I discovered another passion....trapping lol!
~*~ "None left to rescue, none left to buy, none left to suffer, none left to die. None to be beaten, none to be kicked...all must be loved and all must be fixed".
Author Unknown ~*~
~*~*~*~*~*~*~*~*~*~*~*~*~*~*
~BRRR~ I'VE BEEN FROSTED!!!~ BRRR~
PT'er
Oh those kitty beds look really good!
I tried making some for the girls and I had no luck. And I can't seem to find anything on the internet to help with tips to make them.....*sigh....
But,Your beds look awesome and all the kitties obviously Love them...
Good Work
Registered User

You are a great seamster, Kim !!!!
I miss you enormously Sydney, Maya, Inka & ZazouBe happy there at the Rainbow Bridge
Registered User
Beautiful job! Looks like they got the "Seal of Approval" from all concerned!
Loving meowmie to Archy & Binky (RIP my sweet boy 10/13/10)
=^..^=
I
Registered User
You did a beautiful job!!And the cats look like they LOVE them.I wish I could sew.
Retired

Kim,
I LOVE them!! Do you have a pattern for them?? I don't have a sewing machine but I'm SURE I can hand stitch it. This is my favorite:

Kim, you're very talented! I'm sure the kits are greatful!!!
Rest In Peace Casey (Bubba Dude) Your paw print will remain on my heart forever.
Mollie Rose, you were there for me through good times and in bad, from the beginning.Your passing will leave a hole in my heart.We will be together "One Fine Day".
MooShoo,you left me too soon.I wasn't ready.Know that you were my soulmate and have left me broken hearted.I loved you like no other. 1999 - 2010
Maya Linn, my heart is broken. The day your beautiful blue eyes went blind was the worst day of my life.I only wish I could've done something.I'll miss your "premium" purr and our little "conversations". 1997-2013 See you again "ONE FINE DAY"
DO NOT BUY WHILE SHELTER ANIMALS DIE!!
<Jack and The Jacks>
Awesome beds!! And very happy kitties!! I also love the picture that Donna posted
Ashley & Crossbone ("mini ACD")
Living with my parent's: Jack (Lab/Beagle), Micki & Mini (JRTS)
RIP Kyra: 07/11/04 - 11/3/12; Shadow: 4/2/96 - 3/17/08
Registered User
Kim it really looks like the kittys love there new beds but that Pava is adorable she looks like a sweetheart? I just want to snuggle with her she is beautiful.
*I've been Boo'd*
 Posting Permissions
Copyright © 2001-2013 Pet of the Day.com


 Reply With Quote


Bookmarks