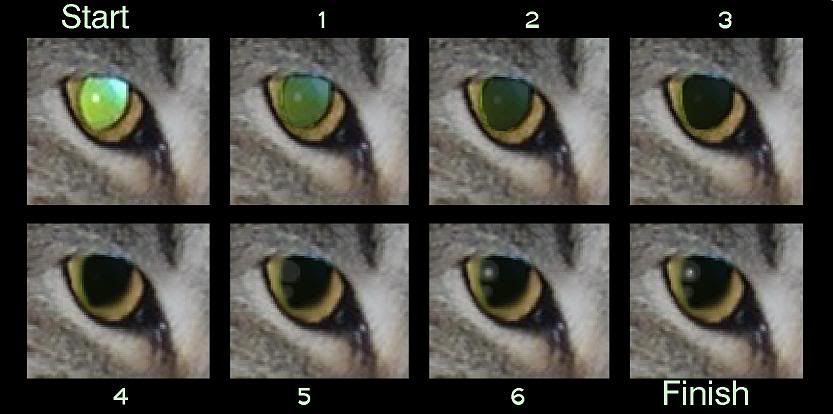
Results 1 to 10 of 10

Thread: Tutorial on removing Ghost Eyes in photographs

  1. #1
    Join Date
    Nov 2003
    Location
    Tabbyville, PA
    Posts
    15,827

    Tutorial on removing Ghost Eyes in photographs

    Start:
    Picture has a green eye where black should be (same goes for yellow, white, or red eyes)


    **Written instructions will be folowed with a block of step-by-step photos **
    Step #1:
    Set the transparency (also know as intensity on some programs) of black to approximately 50%. You will use the Paintbrush tool. Every photo will need a different sized “brush” so keep that in mind and experiment with the different sizes. Fill in the eye, following the outline.

    Step #2:
    Same as step #1, adding a second layer of black on top of the first.

    Step #3:
    Add a third layer… keep layering on the thin black until the desired level of black is achieved. Note: You do not need to slowly build up the black by using thin transparent layers. You can start with solid black, but building up the layers offers more control and more realistic end results. Some of you may not have the option to slowly build up the black using transparent colors, and will have to start with a solid black.

    Step #4:
    Use the smudge, blend, or blur tool to blend the new black center into the rest of the eye. Like building up the black, its best to start lightly and gradually blur, or “feather” the black into the eye. Most programs will allow you to pick the size of the blur tool (like they do with the size of the paintbrush) and how strong the blur will be. Once again, this is something you’ll need to experiment with.

    Step #5:
    Go back to the paintbrush tool. Pick White, but set the transparency around 10%. Use a larger brush size and draw one white dot. Then select a smaller brush size and draw another white dot close by. For those of you without transparency/intensity controlled coloring tools, you will be able to achieve the same look by choosing a dark gray.

    Step #6:
    Still using the paintbrush tool, increase the transparency of the white to 50% and draw another dot in the center of the two dots you’ve already drawn. Use a smaller brush size dot inside each dot. For those without transparency/intensity controlled coloring tools, you will be able to achieve the same look by choosing a gray a few shades lighter than the one chosen for steop #5.

    Finishing step:
    Take out the Pen tool, and set it to a very small point, and draw one small white dot in the center of the larger white spot.


    TA DA! You’ve created natural looking eyes!

  2. #2
    Join Date
    Mar 2004
    Location
    Saskatoon
    Posts
    2,863
    Wow! Thanks!

    -thank you Poppy for the avatar.


    R.I.P. Hanson. You will never be forgotten, and we await the day to see you once again. The imprint you left on my heart will never fade - your big beautiful brown eyes, your big soggy kisses...

  3. #3
    off to try it!!!

  4. #4
    Join Date
    Feb 2002
    Location
    I'm not sure, what day is it? ;-)
    Posts
    13,740
    Wow, I love your step by step photos! I can't wait to get home and try it! Thanks so much!
    Tubby
    Spring 1986 - Dec. 11, 2004
    RIP Big Boy
    -----------
    Peanut
    Fall 1988 - Jan. 24, 2007
    RIP Snotty Girl
    -----------
    Robin
    Fall 1997 - Oct. 6, 2012
    RIP Sweet Monkeyhead Girl

  5. #5
    Thanks Catnapper!! I can't wait to try this with the tons of ghost eyes Tito pictures I have!!

    Pouncer, you are looking handsome as always, my dear. Thanks for being Meowmie's model!

  6. #6
    Join Date
    Oct 2003
    Location
    Middle TN, United States
    Posts
    8,319
    Thanks Kim, great directions!

    Willie

    Thank You, kittycats_delight for my new siggy!!!

  7. #7
    Join Date
    May 2003
    Location
    Vancouver, BC
    Posts
    6,738
    Wow! I'm gonna have to bookmark this thread. Thanks for writing up the tutorial. I've always been bad at fixing eyes.

    This is what I ended up with:


    The original:

    Kai [Sheltie], Kaedyn [Sheltie], Keeva [Malinois], Kwik [Malinois]

  8. #8
    Join Date
    Mar 2002
    Location
    Ohio, USA
    Posts
    19,879
    He was looking up so it seemed hard to get the white in just the right place, how does it look?
    Attached Images Attached Images  

    Huney, Bon & Simba-missed so very much
    Remembering all the Rainbow Bridge Pets

  9. #9
    Thank you Catnapper! I think I did OK for my first try. Here is the "Before" picture:
    Attached Images Attached Images  

  10. #10
    And here's the "After!"
    Attached Images Attached Images  

Similar Threads

  1. Removing rust?
    By catnapper in forum General
    Replies: 10
    Last Post: 04-06-2009, 08:52 PM
  2. Removing decals from vehicle
    By Catty1 in forum General
    Replies: 10
    Last Post: 03-20-2009, 11:22 AM
  3. PSP tutorial for cat eyes
    By Laura's Babies in forum Cat General
    Replies: 8
    Last Post: 11-30-2005, 09:35 AM
  4. Removing cat feces from carpet? HELP!
    By Ethena in forum Cat Behavior
    Replies: 6
    Last Post: 09-05-2004, 09:47 AM
  5. Ghost Eyes
    By catnapper in forum General
    Replies: 9
    Last Post: 08-12-2004, 03:03 PM

Bookmarks

Posting Permissions

  • You may not post new threads
  • You may not post replies
  • You may not post attachments
  • You may not edit your posts
  •  

Copyright © 2001-2013 Pet of the Day.com